

Every year, countless British website owners face the stress of WordPress migration. Moving a site without a plan can risk losing valuable data and precious time. Understanding each step makes migration smoother and protects your digital presence. With over 60 million WordPress users worldwide, knowing the right way to back up, transfer, and test your site can mean the difference between a seamless move and major setbacks.
Table of Contents
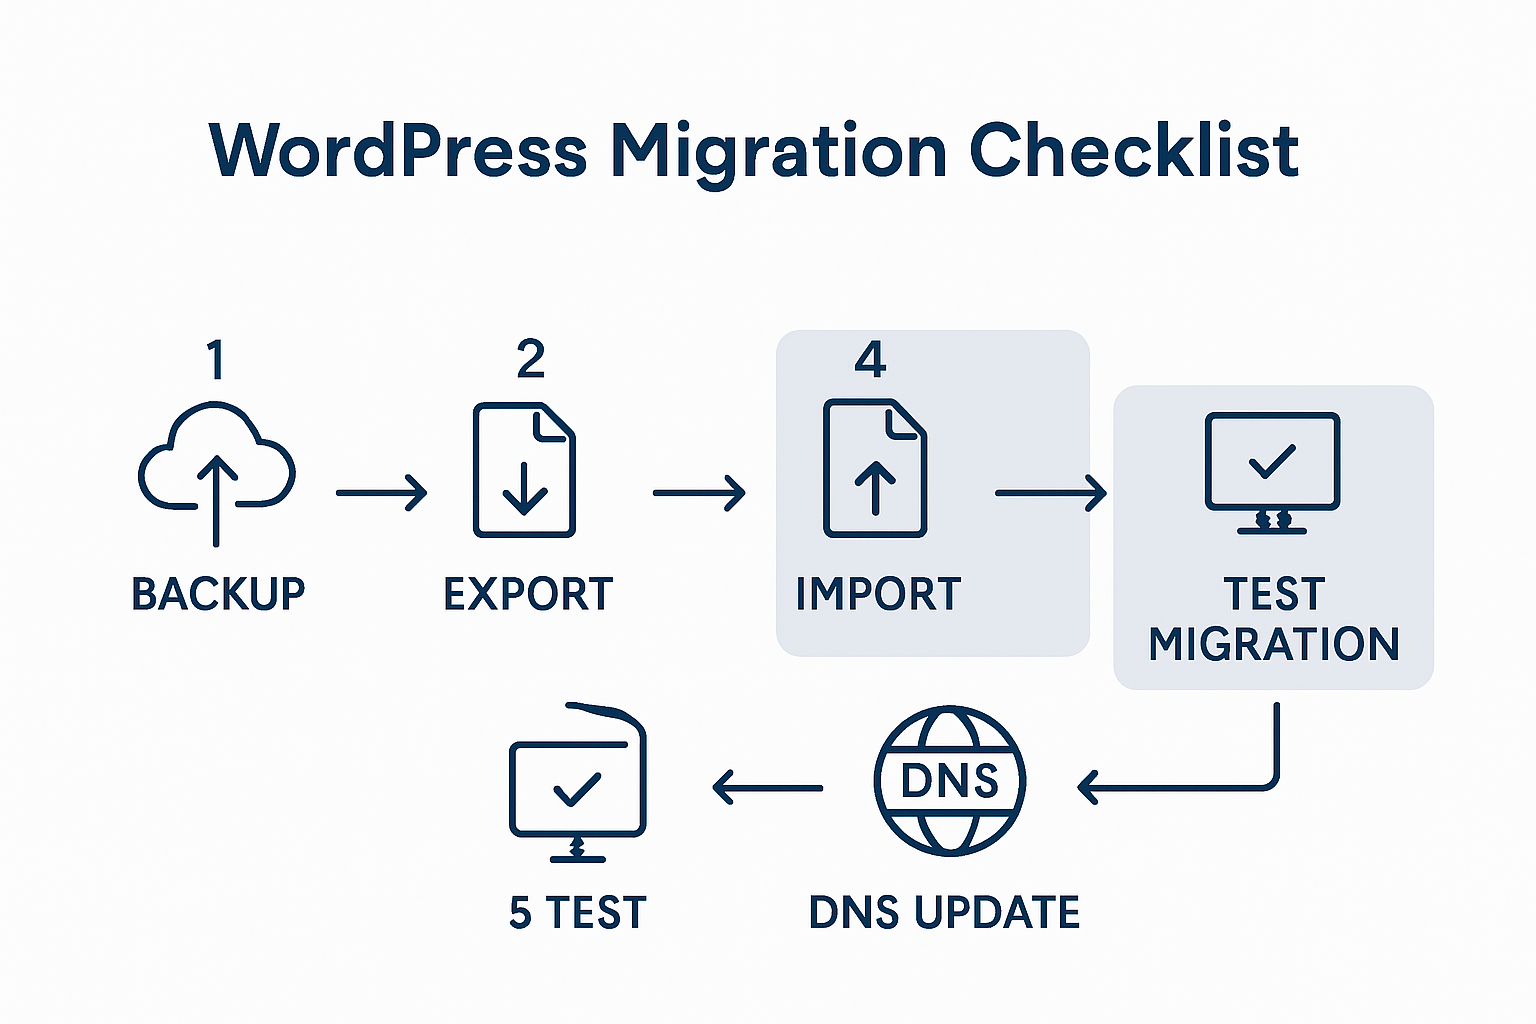
- Step 1: Assess Current Hosting And Prepare Backup
- Step 2: Export Files And Database Securely
- Step 3: Upload Files To The New Hosting Environment
- Step 4: Import Database And Update Configuration
- Step 5: Test Migration And Resolve Common Issues
- Step 6: Finalise Migration And Switch Dns Settings
Quick Summary
| Key Point | Explanation |
|---|---|
| 1. Assess current hosting and backup | Review your current hosting setup and create a full backup to ensure data safety before migration. |
| 2. Securely export files and database | Use secure protocols for file transfer, ensuring all themes, plugins, and database content are properly exported. |
| 3. Upload files to new hosting | Systematically upload your website files to the new host, maintaining the correct folder hierarchy and permissions. |
| 4. Import database and update settings | Import the database carefully, updating your configuration settings to connect to the new hosting environment properly. |
| 5. Test migration and resolve issues | Thoroughly check site functionality and resolve any errors to ensure a seamless transition to the new hosting environment. |
Step 1: Assess current hosting and prepare backup
Preparing for a WordPress migration requires a systematic approach to understanding your current hosting environment and creating a comprehensive backup. This critical first step ensures you have a complete snapshot of your website before initiating any transfer process.
Start by examining your current hosting configuration, which involves reviewing your server details, database specifications, and WordPress installation characteristics. Detailed WordPress migration guidelines from the WordPress Developer Handbook recommend thoroughly documenting your existing setup. This means identifying your current hosting provider, PHP version, MySQL database details, and WordPress version. Collect login credentials for your hosting control panel and FTP access, ensuring you have full administrative permissions to download all website files.
To create a robust backup, you will need two primary components: your complete WordPress file directory and your entire MySQL database. Use your hosting control panel or an FTP client like FileZilla to download all WordPress files, including themes, plugins, and uploads directories. For the database, access phpMyAdmin or use your hosting provider’s backup tools to export a complete SQL database dump. Verify your backup files are intact and can be restored by performing a test restoration on a local environment. This precautionary step prevents potential data loss and provides a safety net during your migration process.
A quick warning: never delete your original site or hosting until you have confirmed a successful transfer and tested the new environment thoroughly.
Step 2: Export files and database securely
Securing your website data during migration requires a methodical and careful approach to exporting both files and database content. This step ensures that every piece of your WordPress site is safely extracted and prepared for transfer.
Comprehensive guidelines from the WordPress Developer Handbook recommend using multiple strategies to export your website files and database securely. For file exportation, connect to your hosting account via secure FTP protocols like SFTP or SSH, which encrypt your file transfer. Download your entire WordPress directory including the wp-content, wp-includes, and wp-admin folders, ensuring you capture all themes, plugins, and uploaded media. When exporting your database, utilise phpMyAdmin with encryption enabled, selecting the full database and choosing an SQL export format. Generate a compressed file to reduce potential transfer errors and verify the file integrity by checking its size and structure.
Prioritise security throughout the export process by using strong, unique passwords, enabling two factor authentication on your hosting account, and avoiding public WiFi networks during transfer. Create multiple backup copies stored in separate locations such as a local hard drive and a secure cloud storage service. Validate your exported files by performing a test restoration on a local development environment, which allows you to confirm that all website components have been successfully captured without data corruption or loss.
Remember that rushed exports often lead to incomplete migrations. Take your time, follow each step carefully, and double check your work before proceeding to the next stage of your WordPress transfer.
Step 3: Upload files to the new hosting environment
Transferring your WordPress website files to a new hosting platform requires precision, patience, and a strategic approach to ensure every component arrives intact and functional. This critical stage bridges your existing website with its new digital home.
Detailed WordPress migration protocols from the Developer Handbook recommend a methodical file upload process that preserves your site’s intricate structure. Begin by connecting to your new hosting account using secure FTP credentials, typically through FileZilla or your hosting control panel’s file manager. Navigate to the public_html or www directory, which serves as your website’s root folder. Upload your previously exported WordPress files systematically ensuring you maintain the exact folder hierarchy. This means transferring wp-admin, wp-includes, wp-content, and root level files like index.php and wp-config.php precisely as they appeared in your original hosting environment.
Pay close attention to file permissions during the upload process, as incorrect settings can compromise your website’s security and functionality. Most WordPress files should have 644 permissions for standard files and 755 for directories. After completing the file transfer, verify that all files have uploaded correctly by comparing file sizes and checking for any transfer interruptions. If you encounter any upload failures, restart the process and consider splitting larger files into smaller segments to prevent potential transfer errors.
Remember that meticulous file transfer sets the foundation for a successful WordPress migration. Take your time, double-check each step, and prepare for the upcoming database configuration phase.
Step 4: Import database and update configuration
Importing your WordPress database and updating configuration settings represents the most critical phase of your website migration. This step transforms your copied files into a fully functioning website at its new hosting location.

Comprehensive WordPress migration protocols from the Developer Handbook outline a precise approach for database importation. Begin by accessing phpMyAdmin in your new hosting environment, creating a new database with identical name as your original site. Import the SQL file you previously exported, ensuring you select the appropriate character set and collation matching your original database configuration. Next, open the wp-config.php file and update database connection details including database name, username, password, and hostname. Double-check these credentials precisely, as even minor discrepancies can prevent your website from connecting successfully.
Be extraordinarily careful when modifying configuration settings. A single incorrect character in your wp-config.php can render your entire website inaccessible. After updating connection details, run a database search and replace procedure to update any hardcoded domain references from your old hosting environment to the new domain. Many migration plugins offer automated tools for this process, helping you systematically replace all instances of your previous site URL with the new hosting domain. Verify each connection by attempting to log into your WordPress admin dashboard and checking that all pages and content display correctly.
Remember that database migration is a delicate process requiring precision and patience. Take your time, validate each step, and be prepared to troubleshoot potential connection issues.
Step 5: Test migration and resolve common issues
Testing your WordPress migration thoroughly is crucial to ensuring your website functions perfectly in its new digital environment. This comprehensive verification process helps you identify and address any potential problems before your site goes live.
Comprehensive WordPress migration testing protocols from the Developer Handbook recommend a systematic approach to site validation. Begin by performing a complete functionality check starting with your admin dashboard. Log in using your previous credentials and verify that all plugins, themes, and custom configurations transfer correctly. Test every page and post, paying special attention to media uploads, embedded content, and internal links. Run through your entire site navigation, checking that all pages load correctly, images display properly, and interactive elements like forms and comment sections work seamlessly.
Pay close attention to potential migration related issues such as broken links, incorrect file paths, or database connection problems. Utilise browser developer tools to identify any hidden javascript errors or missing resources. Check your website performance using speed testing tools to ensure the migration has not negatively impacted loading times. If you encounter any persistent issues, consider using a migration plugin to help diagnose and automatically resolve compatibility problems. Create a staging environment where you can safely troubleshoot without affecting your live site, allowing you to methodically address any technical challenges that emerge during the migration process.
Remember that a successful migration is not just about transferring files but ensuring your entire website ecosystem functions flawlessly in its new home.
Step 6: Finalise migration and switch DNS settings
The final stage of WordPress migration involves switching your domain’s DNS settings to point towards your new hosting environment, effectively transferring your website to its new digital home. This critical process requires precision and careful monitoring to ensure a smooth transition.
Comprehensive WordPress migration protocols from the Developer Handbook recommend a methodical approach to DNS configuration. Begin by logging into your domain registrar account and accessing the DNS management section. Update the nameservers or A records to reflect your new hosting provider’s specific DNS information. Typically, this involves replacing existing nameserver entries with those provided by your new hosting company. Be prepared for potential DNS propagation time which can range from a few hours to 48 hours globally, during which some users might see the old site while others see the new site.
While waiting for DNS propagation, take proactive steps to verify your website’s accessibility. Use online DNS propagation checking tools to monitor how your domain resolves across different global locations. Maintain your existing hosting account temporarily to prevent any potential service interruption. Keep your original site running until you confirm that the new site is fully functional and accessible worldwide. Consider creating a maintenance page on your new hosting environment to provide clear information to visitors during the transition period.
Remember that patience is key during DNS migration. Each small step brings you closer to a successfully transferred WordPress website.
Simplify Your WordPress Migration with Expert Support
Migrating your WordPress website can feel complex and risky, especially when dealing with backups, secure file transfers, database imports, and DNS updates. This comprehensive guide highlights key challenges such as preventing data loss, managing configuration details carefully, and testing thoroughly before going live. If you want to avoid unexpected downtime, broken links, or security gaps, expert assistance is invaluable.
At WPCTO.net, we specialise in providing reliable WordPress migration solutions designed to handle every technical detail seamlessly. Stop worrying about file permissions, database connection issues, or DNS propagation delays and let us manage a smooth transfer for you. Whether you need immediate help or ongoing WordPress site management, our trusted experts deliver quick fixes, security enhancements, and performance optimisation tailored to your business needs. Take the stress out of your migration today by visiting our professional WordPress services page and get ready for a flawless website transition with confidence.
Frequently Asked Questions
What are the first steps in a WordPress migration?
To begin a WordPress migration, assess your current hosting environment and prepare a comprehensive backup of your website. Document your hosting provider details and download your entire WordPress file directory along with your MySQL database.
How do I export my WordPress files and database securely?
Export your WordPress files and database by connecting to your hosting account using secure protocols such as SFTP or SSH. Download your entire WordPress directory and use phpMyAdmin to export your database as an SQL file, ensuring to generate a compressed backup to reduce transfer errors.
What should I pay attention to when uploading files to the new hosting environment?
When uploading files to the new hosting environment, ensure you maintain the exact folder hierarchy and check file permissions. Upload your files systematically and verify that all components have transferred correctly before proceeding with the database configuration.
How do I import my database and update the configuration settings?
To import your database, access phpMyAdmin in your new hosting environment, create a new database with the same name as your original site, and import the SQL file. Update your wp-config.php file with the new database details, and double-check for accuracy to ensure your site connects successfully.
What testing should I perform after migration?
After migration, perform a complete functionality check of your site by logging into your admin dashboard and testing every page, plugin, and theme. Address any issues related to broken links or missing resources, and ensure all interactive elements function correctly before going live.
How do I switch DNS settings to finalise my migration?
To switch your DNS settings, log into your domain registrar account and update your nameservers or A records to reflect your new hosting provider. Monitor the DNS propagation status, which can take up to 48 hours, while keeping your original site operational until you confirm the new site’s accessibility worldwide.
Recommended
- Step by Step Website Migration for WordPress Success – WPCTO
- 7 Essential Steps for a Website Migration Checklist – WPCTO
- How to Restore WordPress Site Step-by-Step for 2025 – WPCTO
- Secure WordPress Hosting and Migration Services – WPCTO
- What to Expect on Moving Day in the UK: Key Steps in 2025 | Schott Removals
- Moving Timeline Checklist: Your Step-by-Step Relocation Guide – Onyx Removals